Building a sovereign LLM inference platform: LiteLLM, vLLM and NIM on H200 behind an F5
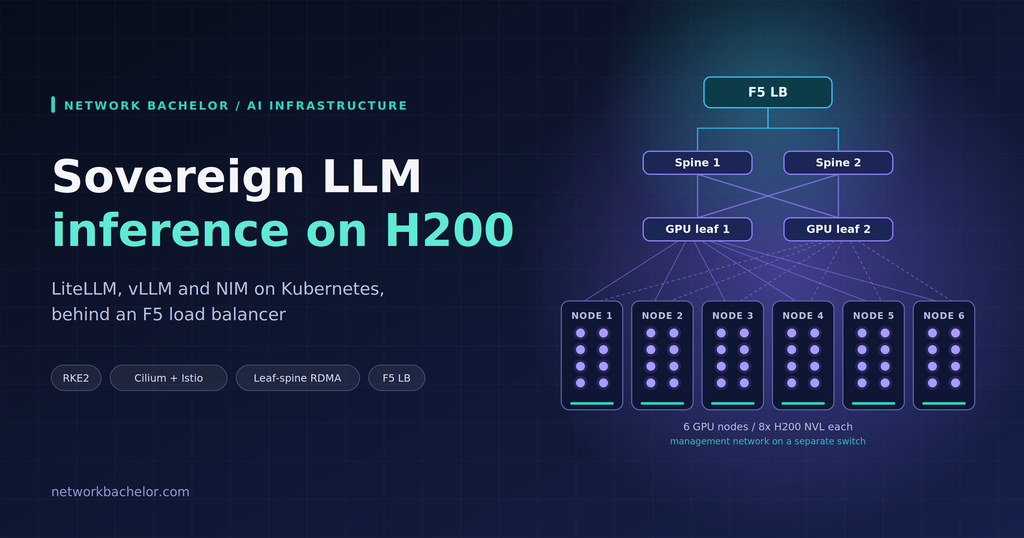
One private, OpenAI-compatible endpoint now serves every internal AI application in our data centre, running entirely on our own H200 GPUs. This post walks through how I built it: Kubernetes on bare metal, the NVIDIA operators, vLLM and NIM serving the models, LiteLLM as the gateway, and an F5 load balancer on the uplink.
The goal: one sovereign endpoint
The scenario is an energy enterprise where firewall analysis, ticket automation and call summarisation all need LLMs, and none of that data may leave the building. Public APIs were off the table. Giving each team its own GPU server would have wasted the hardware and multiplied the operational work.
So the design goal was simple: teams call one URL with one API key format, and the platform decides which model answers, on which GPU, and how much they may spend.
The hardware is six GPU worker nodes, each with 8 NVIDIA H200 NVL cards. That is 1,128 GB of GPU memory per server, 48 GPUs and 6,768 GB in total. Three CPU-only servers run the Kubernetes control plane. Everything is Dell.
By the end of this post you will have seen every layer, in the order I built it:
- The physical topology and what each network carries
- Kubernetes (RKE2) on an immutable OS, with a control plane and GPU workers
- The GPU Operator and Network Operator
- Cluster networking with Cilium, Istio and MetalLB
- Secrets and GitOps
- A shared model cache
- Model servers: vLLM and NIM
- LiteLLM as the gateway
- The F5 load balancer in front of it all
- Validation and the mistakes I would avoid
A note on names: hostnames, IP ranges and tenant details in this post are placeholders. The design and the commands are real.
The topology: three networks, one way in
The platform runs on three separate networks, and the F5 sits on top of the uplink as the only way in.
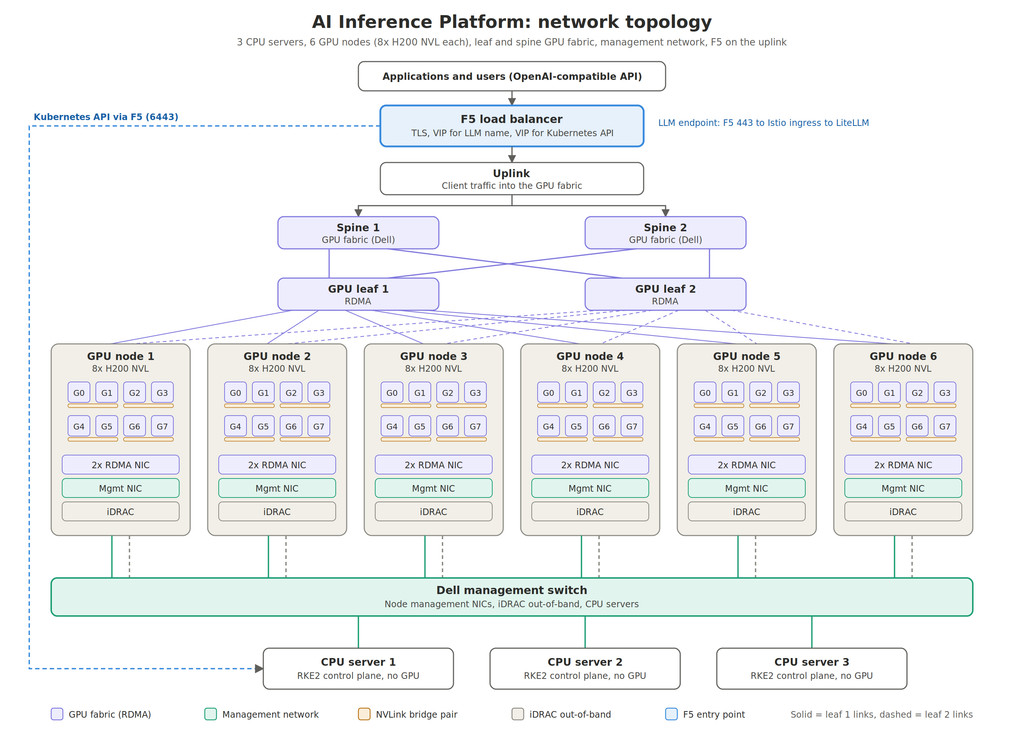
| Network | Carries | Where it lives |
|---|---|---|
| Uplink and F5 | Client requests and the Kubernetes API | The F5 above the uplink |
| GPU fabric | Inbound requests and GPU-to-GPU RDMA traffic | 2 spines, 2 leaves, 2 RDMA NICs per node |
| Management | Node management NICs and iDRAC | Dell management switch, 3 CPU servers |
Keeping these apart is deliberate. A saturated GPU fabric cannot stop you reaching a node’s iDRAC, and a management-network problem cannot slow a model down.
Step 1: Kubernetes on bare metal with RKE2
I split the cluster into three CPU-only control plane nodes and six GPU workers, and I kept AI workloads off the control plane entirely. The control plane runs etcd and the API server. The GPU workers run nothing except the things that need GPUs.
| Role | Count | GPUs | Taint | What runs there |
|---|---|---|---|---|
| Control plane | 3 | none | CriticalAddonsOnly | etcd, API server, scheduler |
| GPU worker | 6 | 8× H200 NVL each | nvidia.com/gpu | drivers, model servers |
All nine machines run an immutable, transactional OS (SLE Micro). The root filesystem is read-only, which is great for consistency and means you cannot install things the usual way. Two consequences shaped the build:
- RKE2 installs from its tarball into
/opt/rke2, not through a package manager. - Anything that needs kernel modules or drivers has to arrive through containers, not
zypper install.
Bootstrap the first server
Before starting the service, write the config. The tls-san entries matter: they must include the load balancer name you will publish for the API, or clients will reject the certificate later.
# /etc/rancher/rke2/config.yaml (first control plane node)
token: <shared-cluster-secret>
tls-san:
  - <k8s-api-fqdn>
  - <k8s-api-vip>
cni: cilium
disable-kube-proxy: true
node-taint:
  - "CriticalAddonsOnly=true:NoExecute"


curl -sfL https://get.rke2.io | INSTALL_RKE2_METHOD=tar sh -
systemctl enable --now rke2-server.service
export KUBECONFIG=/etc/rancher/rke2/rke2.yaml
/var/lib/rancher/rke2/bin/kubectl get nodes
The other two control plane nodes get the same file plus a server: line pointing at the first node, then start the same service. Three etcd members give you quorum with one node down.
Join the GPU workers
Workers use the agent role. I label and taint them at join time so nothing lands on a GPU node by accident.
# /etc/rancher/rke2/config.yaml (GPU worker)
server: https://<k8s-api-fqdn>:9345
token: <shared-cluster-secret>
node-label:
  - "node-role.kubernetes.io/gpu-worker=true"
node-taint:
  - "nvidia.com/gpu=present:NoSchedule"

curl -sfL https://get.rke2.io | INSTALL_RKE2_TYPE=agent INSTALL_RKE2_METHOD=tar sh -
systemctl enable --now rke2-agent.service
The supervisor port 9345 is used only while joining. The API server itself is 6443. Whatever load balancer you put in front of the control plane has to forward both, which comes back in the F5 section.
All nine nodes should now show Ready. The GPU workers have no GPU capability yet, because Kubernetes does not know the cards exist. That is the next step.
Step 2: Teaching Kubernetes about the GPUs and the fabric
Two NVIDIA operators turn a plain Kubernetes node into a GPU node: the GPU Operator handles the cards, the Network Operator handles the RDMA NICs. Neither touches the host OS, which is exactly what an immutable root filesystem needs.
GPU Operator
The GPU Operator deploys a set of DaemonSets on every GPU node: the driver, the container toolkit, the device plugin, GPU Feature Discovery (which labels nodes with GPU model and memory) and the DCGM exporter for metrics. On RKE2 the container toolkit must be told where RKE2 keeps its containerd config, otherwise pods never see the NVIDIA runtime.
helm repo add nvidia https://helm.ngc.nvidia.com/nvidia && helm repo update

helm install gpu-operator nvidia/gpu-operator \
  -n gpu-operator --create-namespace \
  --set toolkit.env[0].name=CONTAINERD_CONFIG \
  --set toolkit.env[0].value=/var/lib/rancher/rke2/agent/etc/containerd/config.toml.tmpl \
  --set toolkit.env[1].name=CONTAINERD_SOCKET \
  --set toolkit.env[1].value=/run/k3s/containerd/containerd.sock \
  --set toolkit.env[2].name=CONTAINERD_RUNTIME_CLASS \
  --set toolkit.env[2].value=nvidia \
  --set toolkit.env[3].name=CONTAINERD_SET_AS_DEFAULT \
  --set-string toolkit.env[3].value=true
The operator’s DaemonSets already tolerate the nvidia.com/gpu taint from step 1, so they land on the GPU workers and nowhere else. Give the driver container a few minutes to build and load, then check what each node advertises:
kubectl -n gpu-operator get pods -o wide
kubectl describe node <gpu-node> | grep -A2 nvidia.com/gpu
# Capacity:  nvidia.com/gpu: 8
Eight per node, 48 across the cluster. If a node shows 0, the driver pod is almost always the culprit, so read its logs first.
Network Operator
The Network Operator does for the RDMA NICs what the GPU Operator does for the GPUs. It installs the NIC driver stack and an RDMA device plugin, so pods can request an RDMA resource the same way they request nvidia.com/gpu. Everything is described in one custom resource:
apiVersion: mellanox.com/v1alpha1
kind: NicClusterPolicy
metadata:
  name: nic-cluster-policy
spec:
  ofedDriver:
    image: doca-driver
    repository: nvcr.io/nvidia/mellanox
    version: <doca-driver-version>
  rdmaSharedDevicePlugin:
    image: k8s-rdma-shared-dev-plugin
    repository: ghcr.io/mellanox
    version: <plugin-version>
    config: |
      {"configList": [{
        "resourceName": "rdma_shared_device_a",
        "rdmaHcaMax": 63,
        "selectors": {"ifNames": ["<rdma-nic-1>", "<rdma-nic-2>"]}
      }]}
Field names and image versions move between releases, so copy the current sample for your operator version rather than trusting this snippet blindly.
One honest point about when this matters. A model that fits inside one node uses NVLink and PCIe between its GPUs, and never touches the RDMA fabric. The two-NIC leaf-and-spine fabric earns its keep for multi-node serving and distributed training. Install it early anyway, because retrofitting a fabric under running workloads is far more painful than doing it up front.
Step 3: Cluster networking, three tools with three jobs
I used Cilium for pod networking, Istio for HTTP-level control, and MetalLB to give services real IP addresses the F5 can target. Each does one job, and keeping those jobs separate is what made the platform debuggable.
| Layer | Tool | Job |
|---|---|---|
| L3-L4 | Cilium (eBPF) | Pod networking, network policy, kube-proxy replacement |
| L7 | Istio | mTLS between services, retries, request-level policy, ingress gateway |
| Service IPs | MetalLB | Hands out routable IPs to LoadBalancer services |
Cilium
Because step 1 set cni: cilium and disable-kube-proxy: true, Cilium must take over service load balancing. RKE2 lets you tune its bundled chart with a HelmChartConfig dropped into the manifests directory on a control plane node:
Cilium
Because step 1 set cni: cilium and disable-kube-proxy: true, Cilium must take over service load balancing. RKE2 lets you tune its bundled chart with a HelmChartConfig dropped into the manifests directory on a control plane node:
# /var/lib/rancher/rke2/server/manifests/rke2-cilium-config.yaml
apiVersion: helm.cattle.io/v1
kind: HelmChartConfig
metadata:
  name: rke2-cilium
  namespace: kube-system
spec:
  valuesContent: |-
    kubeProxyReplacement: true
    k8sServiceHost: <k8s-api-fqdn>
    k8sServicePort: 6443
Check it with cilium status and confirm every node reports the agent as ready. A cluster with no working CNI leaves every pod in ContainerCreating, so this is the first thing to look at when nothing starts.
MetalLB
On bare metal, a Service of type LoadBalancer stays <pending> forever unless something answers for it. MetalLB is that something. I gave it a small dedicated range on the server network and advertised it in layer 2 mode.
helm repo add metallb https://metallb.github.io/metallb
helm install metallb metallb/metallb -n metallb-system --create-namespace
helm repo add metallb https://metallb.github.io/metallb
helm install metallb metallb/metallb -n metallb-system --create-namespaceapiVersion: metallb.io/v1beta1
kind: IPAddressPool
metadata:
name: ingress-pool
namespace: metallb-system
spec:
addresses:
- <ingress-vip-range>
---
apiVersion: metallb.io/v1beta1
kind: L2Advertisement
metadata:
name: ingress-l2
namespace: metallb-system
spec:
ipAddressPools:
- ingress-poolhelm repo add metallb https://metallb.github.io/metallb
helm install metallb metallb/metallb -n metallb-system --create-namespaceapiVersion: metallb.io/v1beta1
kind: IPAddressPool
metadata:
name: ingress-pool
namespace: metallb-system
spec:
addresses:
- <ingress-vip-range>
---
apiVersion: metallb.io/v1beta1
kind: L2Advertisement
metadata:
name: ingress-l2
namespace: metallb-system
spec:
ipAddressPools:
- ingress-poolLayer 2 mode is the simplest and works well when the F5 and the cluster share a VLAN. If your design needs the VIPs routed across subnets, use BGP mode instead and peer with the leaf switches.
Istio
Istio gives the platform mTLS between services and a single ingress gateway that the F5 talks to. I installed the three charts in order:
helm repo add istio https://istio-release.storage.googleapis.com/charts
helm install istio-base istio/base -n istio-system --create-namespace
helm install istiod istio/istiod -n istio-system --wait
helm install istio-ingress istio/gateway -n istio-systemThe gateway Service is type LoadBalancer, so MetalLB assigns it an address from the pool. That address is the pool member the F5 will point at later.
One gotcha specific to LLM traffic: responses stream token by token and can run for minutes. Check the idle and stream timeouts on every hop, including Istio routes and the F5 profile, because the shortest one silently cuts long generations.
Step 4: Secrets and GitOps, so nothing is configured by hand
Every component after this point is deployed by Argo CD from Git, and every secret comes from a vault instead of a manifest. That rule kept the platform reproducible: any node or namespace can be rebuilt from the repository plus the vault.
External Secrets
The platform needs real secrets: the gateway master key, the database connection string, a Hugging Face token and an NGC API key. None of them belong in Git. The External Secrets Operator reads them from Azure Key Vault and turns them into ordinary Kubernetes Secrets.
helm repo add external-secrets https://charts.external-secrets.io
helm install external-secrets external-secrets/external-secrets \
-n external-secrets --create-namespace --set installCRDs=trueOne store object tells the operator how to authenticate to the vault. This is the single secret you create by hand, the credential of an Entra ID application that can read the vault, and it lives only in the cluster.
helm repo add metallb https://metallb.github.io/metallb
helm install metallb metallb/metallb -n metallb-system --create-namespace
apiVersion: metallb.io/v1beta1
kind: IPAddressPool
metadata:
name: ingress-pool
namespace: metallb-system
spec:
addresses:
- <ingress-vip-range>
---
apiVersion: metallb.io/v1beta1
kind: L2Advertisement
metadata:
name: ingress-l2
namespace: metallb-system
spec:
ipAddressPools:
- ingress-poolLayer 2 mode is the simplest and works well when the F5 and the cluster share a VLAN. If your design needs the VIPs routed across subnets, use BGP mode instead and peer with the leaf switches.
Istio
Istio gives the platform mTLS between services and a single ingress gateway that the F5 talks to. I installed the three charts in order:
helm repo add istio https://istio-release.storage.googleapis.com/charts
helm install istio-base istio/base -n istio-system --create-namespace
helm install istiod istio/istiod -n istio-system --wait
helm install istio-ingress istio/gateway -n istio-system
The gateway Service is type LoadBalancer, so MetalLB assigns it an address from the pool. That address is the pool member the F5 will point at later.
One gotcha specific to LLM traffic: responses stream token by token and can run for minutes. Check the idle and stream timeouts on every hop, including Istio routes and the F5 profile, because the shortest one silently cuts long generations.
Step 4: Secrets and GitOps, so nothing is configured by hand
Every component after this point is deployed by Argo CD from Git, and every secret comes from a vault instead of a manifest. That rule kept the platform reproducible: any node or namespace can be rebuilt from the repository plus the vault.
External Secrets
The platform needs real secrets: the gateway master key, the database connection string, a Hugging Face token and an NGC API key. None of them belong in Git. The External Secrets Operator reads them from Azure Key Vault and turns them into ordinary Kubernetes Secrets.
helm repo add external-secrets https://charts.external-secrets.io
helm install external-secrets external-secrets/external-secrets \
  -n external-secrets --create-namespace --set installCRDs=true
One store object tells the operator how to authenticate to the vault. This is the single secret you create by hand, the credential of an Entra ID application that can read the vault, and it lives only in the cluster.
apiVersion: external-secrets.io/v1beta1
kind: ClusterSecretStore
metadata:
  name: azure-kv
spec:
  provider:
    azurekv:
      tenantId: <tenant-id>
      vaultUrl: https://<vault-name>.vault.azure.net
      authSecretRef:
        clientId:
          name: azure-kv-credentials
          namespace: external-secrets
          key: client-id
        clientSecret:
          name: azure-kv-credentials
          namespace: external-secrets
          key: client-secret
Then each namespace declares which vault entries it wants:
apiVersion: external-secrets.io/v1beta1
kind: ExternalSecret
metadata:
  name: litellm-secrets
  namespace: litellm
spec:
  refreshInterval: 1h
  secretStoreRef:
    name: azure-kv
    kind: ClusterSecretStore
  target:
    name: litellm-secrets
  data:
    - secretKey: LITELLM_MASTER_KEY
      remoteRef: {key: litellm-master-key}
    - secretKey: DATABASE_URL
      remoteRef: {key: litellm-database-url}
    - secretKey: HF_TOKEN
      remoteRef: {key: huggingface-token}
    - secretKey: NGC_API_KEY
      remoteRef: {key: ngc-api-key}
Rotating a secret is now a vault operation. The operator picks up the change at the next refresh, and the pods restart on their own schedule.
Argo CD
Our Argo CD instance runs in Azure, not in this cluster. I registered the GPU cluster with it, which is why the Kubernetes API has to be reachable through the F5 on port 6443.
argocd cluster add <kube-context> --name gpu-clusterEach layer of this post is one Argo CD Application. Ordering matters, because a custom resource cannot exist before the operator that defines its CRD. Sync waves handle that.
| Wave | What syncs |
|---|---|
| 0 | Cilium config, MetalLB, External Secrets |
| 1 | Istio, GPU Operator, Network Operator |
| 2 | Cluster policies, IP pools, secret stores |
| 3 | Model cache, model servers |
| 4 | LiteLLM |
apiVersion: argoproj.io/v1alpha1
kind: Application
metadata:
  name: litellm
  namespace: argocd
  annotations:
    argocd.argoproj.io/sync-wave: "4"
spec:
  project: ai-platform
  source:
    repoURL: <git-repo-url>
    path: platform/litellm
    targetRevision: main
  destination:
    name: gpu-cluster
    namespace: litellm
  syncPolicy:
    automated: {prune: true, selfHeal: true}
    syncOptions: [CreateNamespace=true]
With selfHeal on, a manual kubectl edit in production is reverted within minutes. That can feel restrictive at first, and it is also what keeps Git and the cluster honest with each other.
Step 5: A shared model cache, so weights are downloaded once
All model weights live on one shared NFS volume that every GPU node mounts, so a model is downloaded once and read many times. Without it, six nodes each pull the same hundreds of gigabytes through the corporate proxy, and every pod restart repeats the download.
The arithmetic explains why this matters. A model’s weights take roughly its parameter count times the bytes per parameter. A 122B-parameter model needs about 122 GB at 8-bit precision and about 244 GB at 16-bit. A 2 TB volume holds a handful of large models plus their variants, and nothing more.
The volume
I exposed the NAS as a ReadWriteMany volume. The mount options matter for large sequential reads, and the Retain policy protects the weights if someone deletes the claim by mistake.
apiVersion: v1
kind: PersistentVolume
metadata:
  name: model-cache
spec:
  capacity:
    storage: 2Ti
  accessModes: [ReadWriteMany]
  persistentVolumeReclaimPolicy: Retain
  mountOptions: [nfsvers=4.1, hard, nconnect=8]
  nfs:
    server: <nfs-server>
    path: /model-cache
---
apiVersion: v1
kind: PersistentVolumeClaim
metadata:
  name: model-cache
  namespace: nim-service
spec:
  accessModes: [ReadWriteMany]
  storageClassName: ""
  volumeName: model-cache
  resources:
    requests:
      storage: 2Ti
Downloading through the proxy
The cluster has no direct internet access. Hugging Face Hub and NVIDIA NGC are reached through the corporate web proxy. I run the download as a Kubernetes Job so it uses the cluster network, the vault secrets and the shared volume, and leaves a record in Git.
apiVersion: batch/v1
kind: Job
metadata:
  name: fetch-model
  namespace: nim-service
spec:
  backoffLimit: 2
  template:
    spec:
      restartPolicy: Never
      containers:
        - name: fetch
          image: python:3.12-slim
          env:
            - {name: HTTPS_PROXY, value: "http://<proxy-host>:<port>"}
            - {name: NO_PROXY, value: ".svc,.cluster.local,<pod-cidr>"}
            - name: HF_TOKEN
              valueFrom: {secretKeyRef: {name: litellm-secrets, key: HF_TOKEN}}
          command: ["sh", "-c"]
          args:
            - pip install -q "huggingface_hub" &&
              hf download <org>/<model> --local-dir /models/<model-dir>
          volumeMounts:
            - {name: cache, mountPath: /models}
      volumes:
        - name: cache
          persistentVolumeClaim: {claimName: model-cache}
The Job reads the token from a Secret in its own namespace, so the ExternalSecret from step 4 must also exist in nim-service.
Two things that cost time here:
- If your proxy inspects TLS, it re-signs every certificate with a corporate root. Mount that CA into the Job and set
SSL_CERT_FILEandREQUESTS_CA_BUNDLE, or every download fails with a certificate error that looks like a network problem. - NIM containers run as a non-root user. The NFS export must allow that user to write, or NIM cannot populate its cache and exits at startup.
Before moving on, confirm the weights are visible from a GPU node by running a throwaway pod that mounts the claim and lists the directory.
Step 6: Serving the models with vLLM and NIM
I serve Hugging Face models with vLLM and NVIDIA-catalogue models with NIM, and both expose the same OpenAI-compatible API. That common API is the reason the gateway in the next step can treat them as interchangeable backends.
| Alias | Model | Engine | Purpose |
|---|---|---|---|
| frontier | GLM-5.2 | vLLM | Largest general model, hardest tasks |
| advanced | Qwen3.5-122B | NIM | High-quality general and vision-capable work |
| standard | Qwen3.6-35B | vLLM | Everyday workloads, cheapest per token |
| embeddings | bge-m3 | vLLM | Vector embeddings for retrieval |
| rerank | gte-reranker | vLLM | Re-ranking retrieved passages |
| speech | qwen3-tts | vLLM | Text to speech |
The alias is what applications see. The model behind an alias can change without a single application edit, which is the whole point of the gateway.
Placement rules I followed
GPU placement decides both performance and how much of the cluster one model can starve.
- Keep a model’s tensor-parallel group inside one node. The 8 GPUs in a node talk over NVLink and PCIe, which is far faster than crossing the network.
- A model that needs all 8 GPUs owns a node. Smaller models share nodes, and one GPU is enough for embeddings and reranking.
- Never mix a large model and a small one on the same GPU. Memory fragmentation and noisy neighbours make latency unpredictable.
A vLLM deployment
This is the shape of every vLLM model server. Only the model path, the served name and the parallelism change between models.
apiVersion: apps/v1
kind: Deployment
metadata:
  name: vllm-standard
  namespace: <models-namespace>
spec:
  replicas: 1
  selector:
    matchLabels: {app: vllm-standard}
  template:
    metadata:
      labels: {app: vllm-standard}
    spec:
      nodeSelector:
        node-role.kubernetes.io/gpu-worker: "true"
      tolerations:
        - {key: nvidia.com/gpu, operator: Exists, effect: NoSchedule}
      containers:
        - name: vllm
          image: vllm/vllm-openai:<version>
          args:
            - --model=/models/<model-dir>
            - --served-model-name=standard
            - --tensor-parallel-size=4
            - --gpu-memory-utilization=0.90
            - --max-model-len=<context-length>
          ports:
            - containerPort: 8000
          resources:
            limits:
              nvidia.com/gpu: 4
          readinessProbe:
            httpGet: {path: /health, port: 8000}
            initialDelaySeconds: 60
            periodSeconds: 10
          volumeMounts:
            - {name: cache, mountPath: /models, readOnly: true}
            - {name: shm, mountPath: /dev/shm}
      volumes:
        - name: cache
          persistentVolumeClaim: {claimName: model-cache}
        - name: shm
          emptyDir: {medium: Memory, sizeLimit: 16Gi}
---
apiVersion: v1
kind: Service
metadata:
  name: vllm-standard
  namespace: <models-namespace>
spec:
  selector: {app: vllm-standard}
  ports:
    - {port: 8000, targetPort: 8000}
Three details that decide whether it starts:
- The
/dev/shmvolume is not optional. Multi-GPU inference passes tensors through shared memory, and the container default is far too small. - The GPU limit and
--tensor-parallel-sizemust match, or vLLM refuses to start. - The readiness probe needs a long initial delay. Loading a large model from NFS takes minutes, and a too-eager probe sends traffic to a pod that is still loading.
A NIM deployment
NIM packages the model and an optimised inference engine into one container image from NVIDIA’s registry. It needs two credentials: an image pull secret for the registry, and the NGC key to fetch model files on first start. Point its cache at the shared volume so the model is fetched once.
      containers:
        - name: nim
          image: nvcr.io/nim/<org>/<model>:<tag>
          env:
            - name: NGC_API_KEY
              valueFrom: {secretKeyRef: {name: litellm-secrets, key: NGC_API_KEY}}
            - {name: NIM_CACHE_PATH, value: /opt/nim/.cache}
            - {name: NIM_SERVED_MODEL_NAME, value: advanced}
          ports:
            - containerPort: 8000
          resources:
            limits:
              nvidia.com/gpu: 8
          readinessProbe:
            httpGet: {path: /v1/health/ready, port: 8000}
            initialDelaySeconds: 120
            periodSeconds: 15
          volumeMounts:
            - {name: cache, mountPath: /opt/nim/.cache}
      imagePullSecrets:
        - name: ngc-registry
NVIDIA also ships a NIM Operator that manages caches and services as custom resources. I would evaluate it once the number of NIM models grows, but a plain Deployment is easier to reason about for the first few.
When the pods are Ready, test each one directly from inside the cluster before the gateway exists:
kubectl -n <models-namespace> run curl --rm -it --image=curlimages/curl -- \
  curl -s http://vllm-standard:8000/v1/models
If that returns the served model name, the model layer works and everything above it is plumbing.
Step 7: LiteLLM, the single front door for every model
LiteLLM turns six different model servers into one API, and adds the things raw model servers lack: per-team keys, budgets, rate limits, retries and usage tracking. Applications talk to LiteLLM using the OpenAI client library they already know, and never learn where a model runs.
What LiteLLM needs
- A PostgreSQL database for keys, teams, spend and logs. I used a managed PostgreSQL service outside the cluster, so the gateway stays stateless and the state survives a cluster rebuild. Azure requires
sslmode=requirein the connection string. - The master key and database URL, delivered by the ExternalSecret from step 4.
- A
config.yamlthat maps each public alias to a backend service.
The configuration
Each model_name is what applications request. Each litellm_params block points at the in-cluster Service of a model server. Because vLLM and NIM both speak the OpenAI protocol, LiteLLM treats them all as openai/ backends.
model_list:
  - model_name: frontier
    litellm_params:
      model: openai/frontier
      api_base: http://vllm-frontier.<models-namespace>.svc.cluster.local:8000/v1
      api_key: none
  - model_name: advanced
    litellm_params:
      model: openai/advanced
      api_base: http://nim-advanced.<models-namespace>.svc.cluster.local:8000/v1
      api_key: none
  - model_name: standard
    litellm_params:
      model: openai/standard
      api_base: http://vllm-standard.<models-namespace>.svc.cluster.local:8000/v1
      api_key: none
  - model_name: bge-m3
    litellm_params:
      model: openai/bge-m3
      api_base: http://vllm-embed.<models-namespace>.svc.cluster.local:8000/v1
      api_key: none

router_settings:
  num_retries: 2
  timeout: 600
  fallbacks:
    - frontier: [advanced]

general_settings:
  master_key: os.environ/LITELLM_MASTER_KEY
  database_url: os.environ/DATABASE_URL

litellm_settings:
  drop_params: true
Two lines earn their place. The fallbacks entry means that if the largest model is down or overloaded, requests quietly go to the next tier instead of failing. The timeout of 600 seconds keeps long generations from being cut off by the gateway.
The deployment
Run at least three replicas behind one Service, since the gateway is stateless.
apiVersion: apps/v1
kind: Deployment
metadata:
  name: litellm
  namespace: litellm
spec:
  replicas: 3
  selector:
    matchLabels: {app: litellm}
  template:
    metadata:
      labels: {app: litellm}
    spec:
      containers:
        - name: litellm
          image: ghcr.io/berriai/litellm:<version>
          args: ["--config", "/app/config.yaml", "--port", "4000"]
          envFrom:
            - secretRef: {name: litellm-secrets}
          ports:
            - containerPort: 4000
          readinessProbe:
            httpGet: {path: /health/readiness, port: 4000}
          volumeMounts:
            - {name: config, mountPath: /app/config.yaml, subPath: config.yaml}
      volumes:
        - name: config
          configMap: {name: litellm-config}
---
apiVersion: v1
kind: Service
metadata:
  name: litellm
  namespace: litellm
spec:
  selector: {app: litellm}
  ports:
    - {port: 4000, targetPort: 4000}
With several replicas, per-key rate limits are only accurate if the replicas share a counter. That is what a Redis instance is for in LiteLLM, and I recommend adding one before you enforce strict limits.
Exposing it through Istio
The Istio ingress gateway from step 3 receives the traffic and routes it to the Service.
apiVersion: networking.istio.io/v1
kind: Gateway
metadata:
  name: llm-gateway
  namespace: litellm
spec:
  selector:
    istio: ingress
  servers:
    - port: {number: 80, name: http, protocol: HTTP}
      hosts: ["<llm-fqdn>"]
---
apiVersion: networking.istio.io/v1
kind: VirtualService
metadata:
  name: litellm
  namespace: litellm
spec:
  hosts: ["<llm-fqdn>"]
  gateways: [llm-gateway]
  http:
    - route:
        - destination: {host: litellm, port: {number: 4000}}
      timeout: 0s
The timeout: 0s disables Istio’s route timeout so streamed answers are not cut off. TLS is handled one hop earlier, on the F5.
Keys, teams and budgets
Every application gets its own virtual key, restricted to the aliases it needs and limited in rate. That is what stops one runaway script from taking the whole platform down.
curl -X POST https://<llm-fqdn>/key/generate \
  -H "Authorization: Bearer $LITELLM_MASTER_KEY" \
  -H "Content-Type: application/json" \
  -d '{
    "key_alias": "firewall-analysis",
    "models": ["standard", "bge-m3"],
    "tpm_limit": 200000,
    "rpm_limit": 60,
    "metadata": {"team": "network-security"}
  }'
For people, I sign administrators in to the LiteLLM admin UI with our identity provider (Microsoft Entra ID) instead of a shared password. LiteLLM reads the Entra application details from environment variables, so they come from the vault like everything else. Check LiteLLM’s current licensing for how many SSO users the free tier allows before you plan around it.
Step 8: The F5 on top of the uplink
The F5 is the only entry point into the platform: it owns the public name of the LLM endpoint and the name of the Kubernetes API, and everything behind it stays on private addresses. Clients reach the F5, the F5 sends traffic down the uplink into the fabric, and the Istio gateway takes it from there.
Two virtual servers do all the work:
| Virtual server | Port | Pool members | Health check |
|---|---|---|---|
| LLM endpoint | 443 | Istio ingress VIP (from MetalLB) | HTTP GET on the gateway readiness path |
| Kubernetes API | 6443 and 9345 | The three control plane nodes | TCP connect |
The second row is the reason step 1 asked you to put the load balancer name in tls-san, and the reason Argo CD in Azure can manage this cluster.
The LLM virtual server
I terminate TLS on the F5 with the enterprise certificate, so applications trust the endpoint with no extra configuration. If your security policy demands encryption all the way in, add a server-side SSL profile and enable TLS on the Istio gateway as well.
# Health monitor: the Host header must match the Istio VirtualService host
tmsh create ltm monitor http litellm-health defaults-from http \
  send "GET /health/readiness HTTP/1.1\r\nHost: <llm-fqdn>\r\nConnection: close\r\n\r\n" \
  recv "200"

tmsh create ltm pool llm-istio-pool \
  members add { <istio-ingress-vip>:80 } monitor litellm-health

# Long idle timeout so streamed generations are not cut off
tmsh create ltm profile tcp llm-tcp defaults-from tcp idle-timeout 600

tmsh create ltm profile client-ssl llm-clientssl defaults-from clientssl \
  cert <cert-name> key <key-name>

tmsh create ltm virtual llm-vs \
  destination <f5-vip>:443 ip-protocol tcp pool llm-istio-pool \
  profiles add { llm-tcp http llm-clientssl } \
  source-address-translation { type automap }
Three settings prevented the failures that are hardest to diagnose:
- The monitor sends the real
Hostheader. Istio routes by hostname, so a monitor without it gets a 404 and the F5 marks a healthy pool as down. - The TCP profile idle timeout is 600 seconds. The F5 default is shorter than a long generation, and the symptom is an answer that stops mid-sentence.
- Do not enable HTTP compression or response buffering on this virtual server. Streaming depends on tokens flowing through as they are produced.
SNAT automap makes the return traffic come back through the F5. It is the simplest choice while the F5 and the MetalLB range share a VLAN.
The Kubernetes API virtual server
This one is plain TCP, because Kubernetes clients and the API server negotiate TLS themselves.
tmsh create ltm pool k8s-api-pool monitor tcp \
  members add { <cp-node-1>:6443 <cp-node-2>:6443 <cp-node-3>:6443 }

tmsh create ltm virtual k8s-api-vs \
  destination <k8s-api-vip>:6443 ip-protocol tcp \
  pool k8s-api-pool profiles add { tcp }
Repeat the same pair for port 9345 if you want workers to register through the load balancer. Keep the pool members to the control plane nodes only.
Finally, save the configuration with tmsh save sys config. It is the step everyone forgets, and an unsaved F5 loses the virtual servers at the next restart.
Step 9: Validate from the bottom up
Test the platform one layer at a time, starting at the hardware, so a failure points at exactly one layer. Testing only the final URL tells you something is broken and nothing else.
| Layer | Check | Healthy result |
|---|---|---|
| Nodes | kubectl get nodes | 9 nodes Ready |
| GPUs | Node capacity for nvidia.com/gpu | 8 on each of 6 workers, 48 in total |
| Driver | nvidia-smi in a test pod | 8 H200 cards listed |
| Model server | /v1/models from inside the cluster | The served model name |
| Gateway | Same call to the LiteLLM Service | The public aliases |
| Entry point | Same call through the F5 name | The public aliases |
GPU visibility
kubectl get nodes -o custom-columns=NAME:.metadata.name,GPU:.status.capacity.nvidia\\.com/gpuA throwaway pod confirms the driver and the runtime work together:
apiVersion: v1
kind: Pod
metadata:
  name: gpu-smoke-test
spec:
  restartPolicy: Never
  tolerations:
    - {key: nvidia.com/gpu, operator: Exists, effect: NoSchedule}
  containers:
    - name: smi
      image: nvcr.io/nvidia/cuda:<tag>-base-ubuntu22.04
      command: ["nvidia-smi"]
      resources:
        limits:
          nvidia.com/gpu: 8
End to end through the F5
This is the request every application will make, so it is the one that matters.
curl https://<llm-fqdn>/v1/chat/completions \
  -H "Authorization: Bearer <virtual-key>" \
  -H "Content-Type: application/json" \
  -d '{
    "model": "standard",
    "messages": [{"role": "user", "content": "Reply with one word: ready"}]
  }'
Then the same call from the official Python client, which is how your applications will use it:
from openai import OpenAI

client = OpenAI(base_url="https://<llm-fqdn>/v1", api_key="<virtual-key>")

stream = client.chat.completions.create(
    model="standard",
    messages=[{"role": "user", "content": "Explain what a leaf switch does."}],
    stream=True,
)
for chunk in stream:
    print(chunk.choices[0].delta.content or "", end="")
Watch the output arrive gradually. If the whole answer appears at once after a long pause, something between the model and the client is buffering, and the F5 profile is the first place to look.
Embeddings use the same endpoint:
curl https://<llm-fqdn>/v1/embeddings \
  -H "Authorization: Bearer <virtual-key>" \
  -H "Content-Type: application/json" \
  -d '{"model": "bge-m3", "input": "leaf and spine"}'
Break it on purpose
A platform you have only seen working is not validated. Before real users arrive, run these failure tests.
| Test | Expected behaviour |
|---|---|
| Delete one LiteLLM pod during a request | The other replicas serve traffic and the F5 keeps the pool up |
| Scale the largest model to zero | Requests fall back to the next tier through the fallbacks rule |
| Reboot one GPU worker | Its models reschedule or fail over, and the other nodes are unaffected |
| Take one control plane node down | kubectl keeps working and the F5 marks that member down |
| Use a key outside its allowed models | The gateway returns an authorisation error, not a model answer |
What to watch, and where to take it next
The platform works when every layer has an owner and a health signal. Most of what goes wrong later is a missing signal, not a missing feature.
The failure patterns to expect
| Symptom | Usual cause | Where to look |
|---|---|---|
| GPU node shows 0 GPUs | Driver pod not ready | Logs of the driver pod in the GPU Operator namespace |
| Pods stuck in ContainerCreating | CNI not healthy | cilium status |
| LoadBalancer Service stays pending | No address pool or advertisement | MetalLB pool and advertisement objects |
| Model pod restarts on start | Shared memory too small, or GPU count mismatch | /dev/shm volume and parallelism flag |
| NIM exits at startup | NFS not writable by its user | Export permissions on the cache path |
| F5 pool shows down, pods healthy | Monitor missing the Host header | Monitor send string |
| Answers stop mid-sentence | An idle timeout on one hop | F5 TCP profile, then Istio route |
| Downloads fail with certificate errors | Proxy re-signs TLS | Corporate CA inside the Job |
Where I would take it next
- Add Redis so per-key rate limits are shared across all gateway replicas.
- Scrape the DCGM exporter and LiteLLM metrics into the monitoring stack, and alert on GPU memory, queue depth and time to first token, not just pod restarts.
- Add Kubernetes network policies so only the gateway can reach the model servers. Today anything inside the cluster can call a model directly.
- Run two replicas of the models that matter most, on different nodes, so a node reboot is not an outage.
- Rotate the vault credentials and virtual keys on a schedule, and test the rotation before you need it.
The shape of the whole design
The design rests on one idea: keep each layer’s job narrow. The fabric moves bytes, Kubernetes places containers, the operators expose hardware, the model servers run weights, LiteLLM applies policy, and the F5 decides who gets in. When something breaks, that separation is what lets you say which layer, in minutes, instead of arguing about it for a day.
NSX-T Series: Part 17 – NSX-T Segment T1 and T0 on same Edge Cluster T0 as SR

Private LLMaaS and its Business Opportunities
API Security Architecture: Inline vs Out-of-Band Enforcement
About Author

abhishek
Cloud Platform Lead and AI Infrastructure Architect at e& enterprise, with 12+ years in data center, virtualization, security and AI infrastructure. I design and build private cloud and sovereign AI platforms, working with VMware (NSX-T, vSphere, vSAN, HCX, AVS, SRM), Kubernetes, Terraform and GPU inference infrastructure for LLMs. Previously served Networkers Home (CCIE instructor, trained around 50 CCIEs), VCE/EMC2, Cisco, VMware and Arista across TAC, consulting, design and training. Certifications: CCIE#48639 (Data Center and R&S), VCIX-DCV and NV, CKA, NVIDIA AI Infrastructure, Azure Solutions Architect Expert, Terraform Associate, Palo Alto PCNSE. LinkedIn: https://www.linkedin.com/in/abhishekkunal51/