NSX-T Series: Part 7 – NSX-T ESXi Transport Node
In this “NSX-T Series: Part 7 – NSX-T ESXi Transport Node” part, we will discuss the steps to install and it as Transport Node for NSX-T Data Center. We will throw light how to verify the transport node via different methods.
But if you want to start from beginning you can refer my previous part of the Series:
NSX-T Series : Part 1 -Architecture and Deploy
NSX-T Series : Part 2 – Adding Compute Manager
NSX-T Series : Part 3 – Planning NSX VXLAN
NSX-T Series : Part 4 – Transport Zones and Use cases for Multi-Transport Zone
NSX-T Series: Part 5 – NSX-T N-VDS and VDS 7.0
NSX-T Series: Part 6 – NSX-T Uplink Profile
How to add ESXi as Transport Node
In any datacenter the ESXi and vCenter design is defined on the basis of many factors, it could be on the basis of kind of customer you are giving the service. There could be dedicated vCenter per Customer if it is at larger scale, or could be shared environment.
As we have already discussed on our previous blogs that NSX-T is independent with vCenter and we can have multiple vCenter. Even we have option of adding ESXi as native transport node. You can refer our previous blogs on the Design deep dive.
Basically to add ESXi we can add ESXi individually option or with Transport Node Profile. Using transport node profile gives the power of speedy deployments and avoids any manual error. This is very similar concept to Cisco ACI where we have template concept for different components like Switch Profile and it maps to other policy like interface policy, CDP/LLDP Policy, Port-Channel Policy and many more.
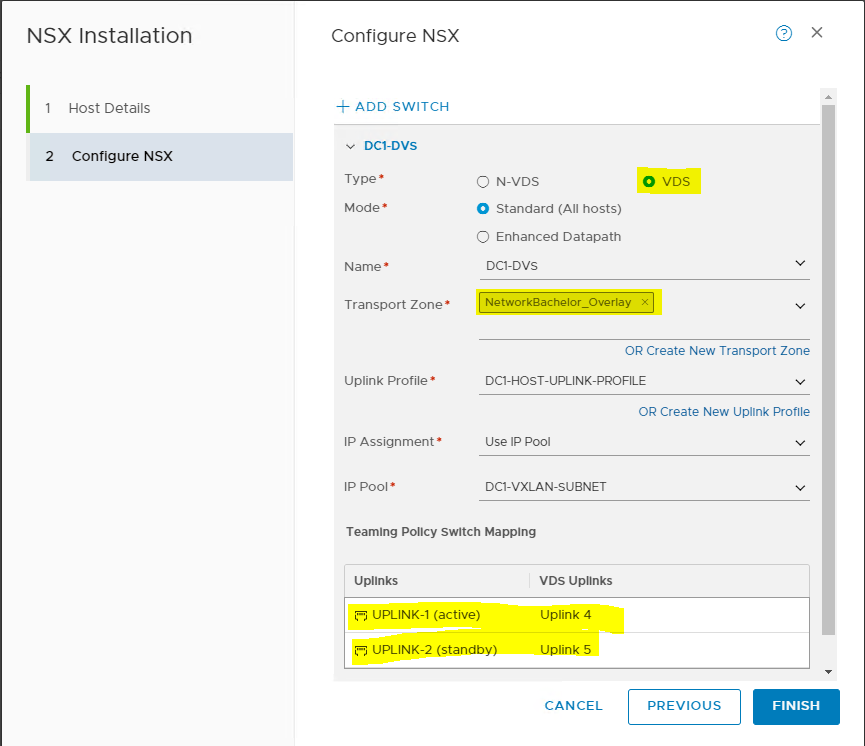
Now with NSX-T 3.0 plus with vCenter 7.0 version we have option to use DVS for ESXi. Though you have option to choose N-DVS still available and one can use it, but it’s recommended to go with DVS 7.0.
According to your NIC mapping and physical network infra one can choose the teaming policy and map related interfaces.
NSX-Manager and ESXi
When you add the ESXi as transport node, the NSX-T Manager will start the installation of the related VIBs and VXLAN VMK Configuration. This is the same architecture which is followed in NSX-V. ( One can relate this in ACI as Discovery process ).
VIBS:
Post installation you will find following VIB’s installed on the ESXi:
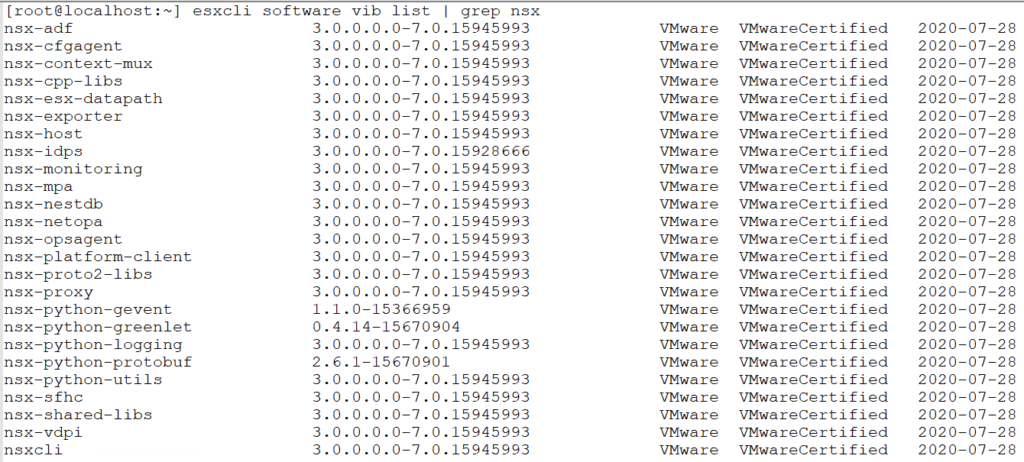
The following vibs functions for different operations :
nsx-aggservice : It runs on management plane nodes and fetches the runtime state of NSX-T components.
nsx-da : Collects discovery agent data about the hypervisor OS version, VMs, and network interface.
nsx-esx-datapath : Gives Dataplane packet-processing functionality.
nsx-exporter : Provides host agents that report runtime state to the aggregation service.
nsx-host : Provides metadata for the VIB bundle that is installed on the host.
nsx-lldp : Provides support for the LLDP.
nsx-mpa : Communication between NSX manager and hypervisor hosts.
nsx-netcpa : Communication between CCP ( Central Control Plane ) and hypervisor hosts.
nsx-python-protobuf : Provides python bindings for protcol buffers.
nsx-sfhc : Service fabric host component (SFHC) provides a host agent for managing the life cycle of the hypervisor as a fabric host.
nsxa : Host level configuration such as N-DVS creation.
nsxcli : NSX-T CLI on hypervisor hosts.
nsx-support-bundle-client : Provides ability to collect support bundles.
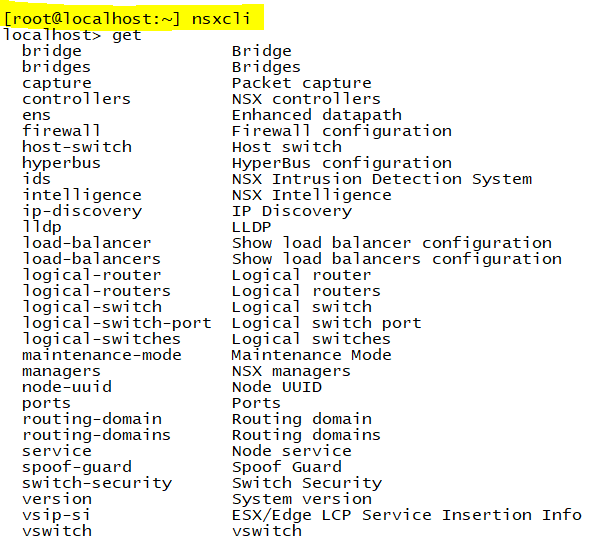
With the help of nsxcli one can verify the host level info. Phew ! need not to follow the native ESXi commands, and we can use ? for getting commands.
Verification :
VXLAN :
And similarly there will be 2 vmk will be installed on the ESXi Host :
vmk10 : This is used for VTEP purpose and assigned from the IP pool
vmk50 : This is used for Kubernetes PKS solution
Though one can design to have multiple VTEP option also as per your infra demand.

NSX-T Manager :
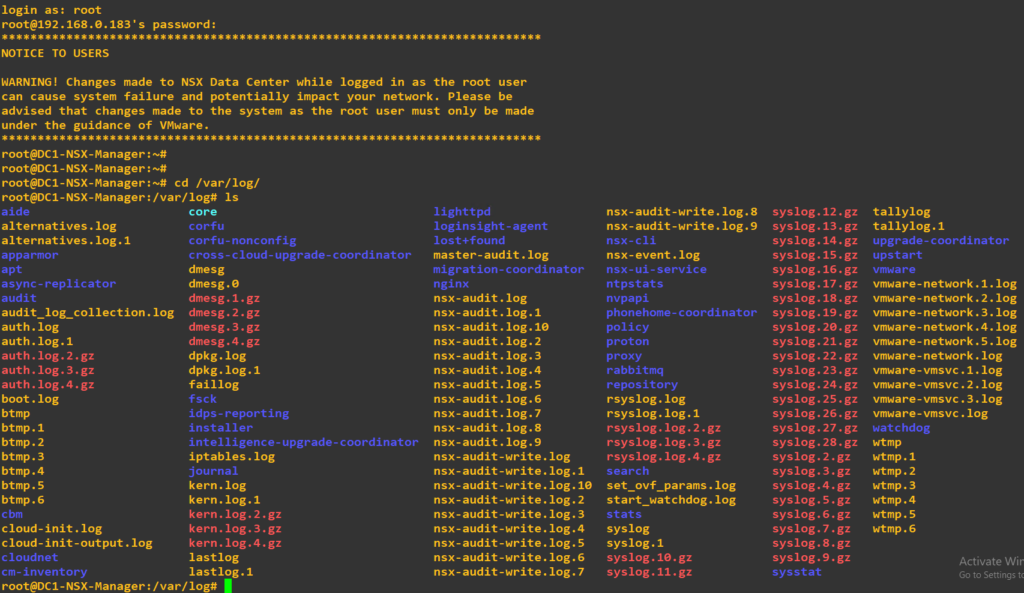
Sometime we need to monitor the installation process of the VIBs and progress and one can monitor the logs on the ESXi host. The most log which one can verify will be “syslog“
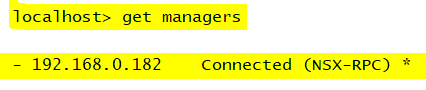
Via Admin one can verify the transport nodes and it’s associated Controller ( In the screenshot lab we have single NSX Manager )

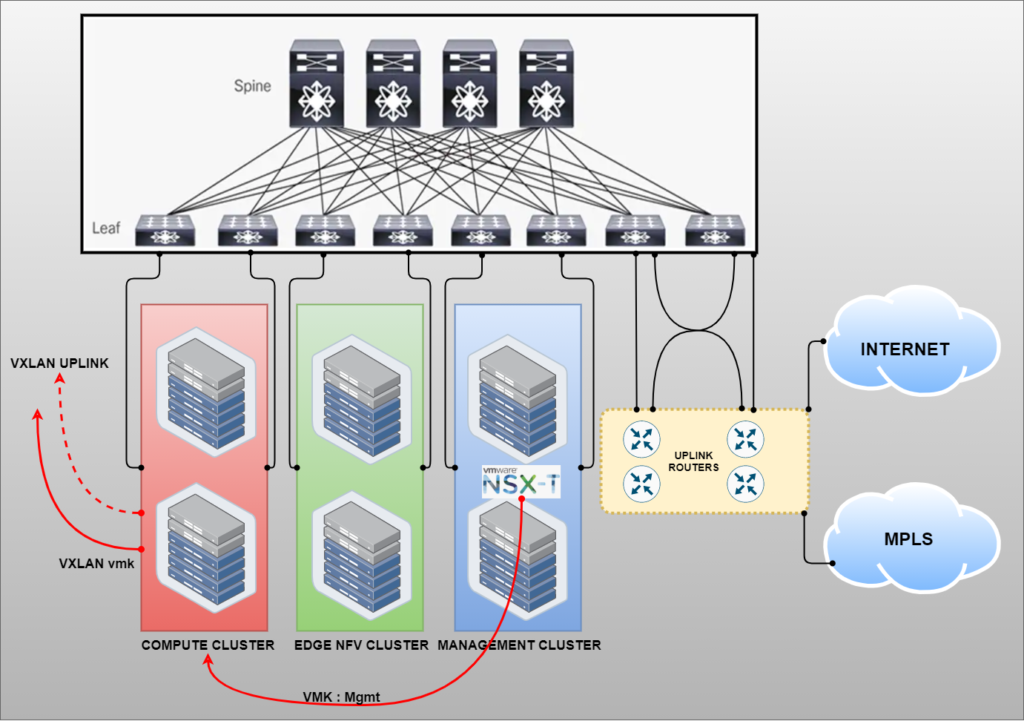
Bigger Picture
As an high level post installation of VIB one can say the environment is almost ready to server East-West traffic. In the rack design we can define the transport node ( profile ) to extend the VXLAN for the related Transport Zone. As per design we extend VXLAN in Compute Cluster and Edge Cluster (N-DVS) only.

Summary
In this blog we covered the method of adding ESXi to the transport node to NSX-T. We checked the verification methods and understood the differemt VIBs functions. Adding to that we from high level understood the extensibility of VXLAN as per Rack design. Thanks for visiting the blog.
vCloud Director: NSX-V to NSX-T Migration Part-2
VMware Design Bootcamp-4: NSX-T and AVI Load-balancer
VMware vSAN Solution Analysis
About Author
abhishek
Expert in Network, Virtualization and Security field in On-Prem and Public Cloud. Passionate about new technology and consult the best solution to business organisation.Previously served Networkershome, EMC2, Cisco, VMware and Arista in different fields of Engineering, TAC, Consulting, Designing and Training. Certification : CCIE#48639, VCIX DCV and NV, Aviatrix Multi Cloud, SD-WAN Specialist, Palo Alto PCNSE, Amazon Cloud, Docker Certified Engineer. LinkedIn : https://www.linkedin.com/in/abhishekkunal51/
Hi Abhishek,
I had gone thru your blog all posts are awesome.
Just see if you can help here in the below scenario.
I deployed NSXT 3.x on my lab
UCSB–>FI–ACI
Do I need to use the TRANSPORT zone as VLAN or overlay?
because UCS will understand only tagged VLAN.
Could you help me to understand better?
“NSX-T Series: Part 6 – NSX-T Uplink Profile” link is missing.
Hello Masters, could you please either fix URL for Part 6 of this interesting series or paste here the correct link to Part 6? Thank you. Tomas