NVIDIA DGX SuperPOD: Build a Mini SuperPOD Lab Step by Step
A plain-language, do-it-yourself walkthrough of how NVIDIA DGX SuperPODs actually get installed — using nothing but a laptop, some free tools, and curiosity. No GPUs, no data center, no vCluster required.
Want to understand how an NVIDIA DGX SuperPOD is actually built without having a data center full of GPUs?
This hands-on guide breaks NVIDIA DGX SuperPOD architecture into a simple laptop lab. Using virtual machines, Ansible, Kubernetes, and free tools, you can explore the same core concepts used to provision, manage, schedule, and operate large-scale AI infrastructure.
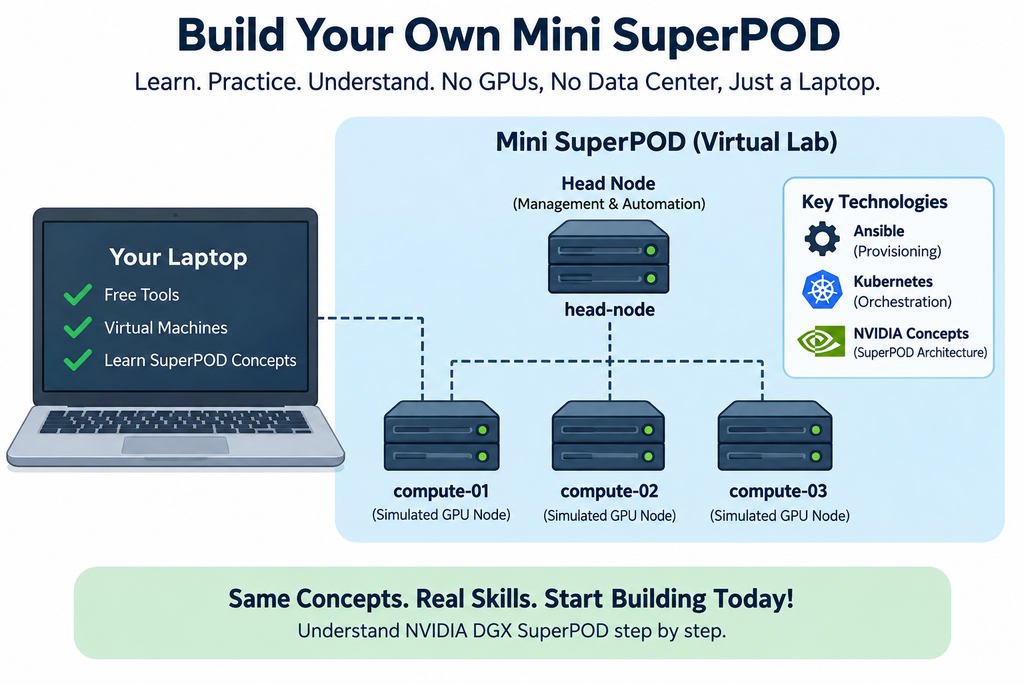
First, we will build the basic cluster topology. Next, we will configure a head node and explore automated provisioning. Then, we will add Kubernetes and examine GPU workload scheduling. Finally, we will connect these concepts to NVIDIA Mission Control.
This workbook documents the standard, vendor-supported path for standing up a DGX SuperPOD — the one NVIDIA ships in its own deployment guides — as distinct from a vCluster-based multi-tenancy model. Every command example below is either pulled directly from NVIDIA’s official reference architecture, or genuinely executed and screenshotted for this document where the exact tool could be run in a general-purpose environment (Ansible, Helm/Kubernetes manifests, the public GPU Operator source). Where a step requires proprietary BCM software or physical DGX hardware, the command syntax is given as documented reference rather than a simulated screenshot.
1. The Anatomy of a SuperPOD
What are we actually building, and what are its parts called?
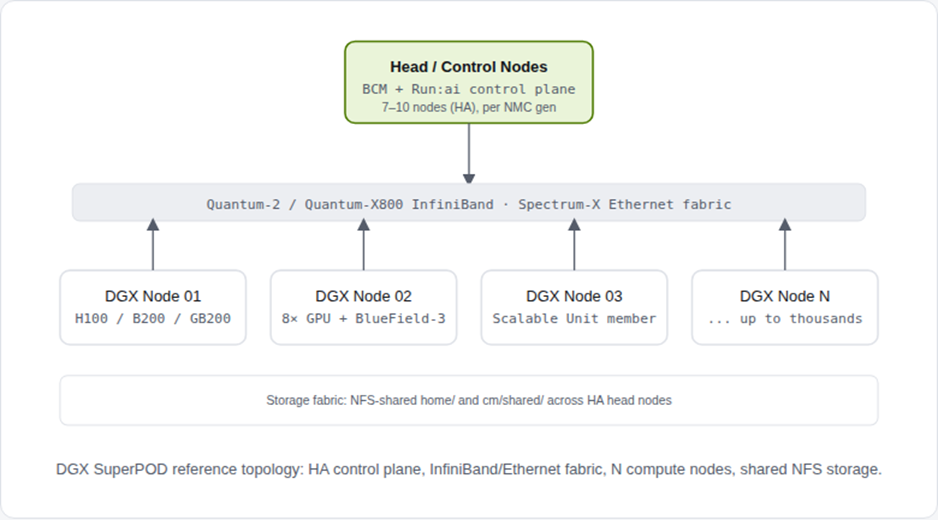
Strip away the marketing, and a SuperPOD is three things wired together:
| PIECE | REAL-WORLD ROLE | WHAT WE’LL SIMULATE |
| Compute nodes (DGX systems) | Do the actual AI training / inference work | Regular VMs, pretending to have GPUs |
| Head / control node | Installs software on every other node and manages the cluster | One VM running our management tools |
| Fabric (InfiniBand / Ethernet) | Ultra-fast network so GPUs can talk to each other | A regular virtual network — same concept, slower speed |
Reference Architecture Overview
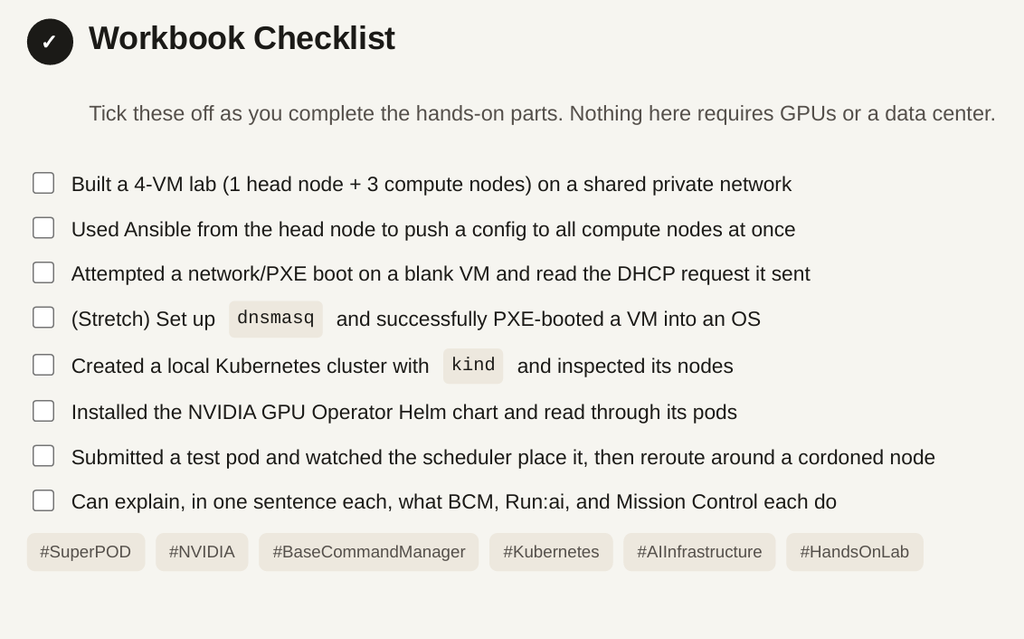
Practice — Section 1
- Install multipass on your laptop (free, works on Mac/Windows/Linux). VirtualBox or
- Create 4 lightweight VMs: name one head-node and three compute-01 , compute-02 ,
ompute-03 . 1 CPU / 1GB RAM each is enough — we’re modeling the topology, not the horsepower. - Put all four on the same private network (VirtualBox: “Internal Network”; multipass: default bridge). This private network is standing in for the InfiniBand fabric.
- From head-node , confirm you can reach the others: ping compute-01 . If that works, you’ve just built the physical + network layer of a SuperPOD.
2. The Head Node: Who’s In Charge
Real SuperPODs use NVIDIA Base Command Manager (BCM). We’ll build a tiny version of the same idea.
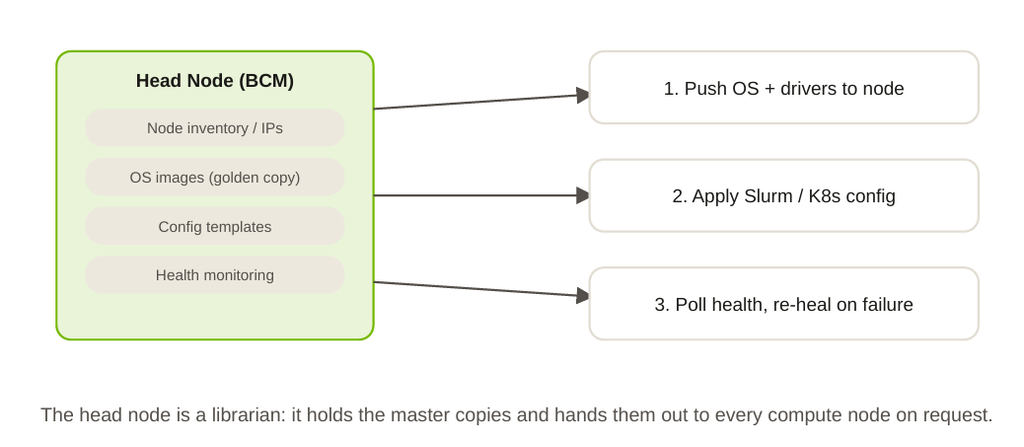
In a real deployment, the head node runs NVIDIA Base Command Manager (BCM) — software whose whole job is to know about every compute node, push an operating system onto it, and keep tabs on its health. It automates provisioning and administration of a SuperPOD from hundreds to thousands of nodes. Nothing happens on a compute node that the head node didn’t authorize or push
out.
Think of it like: a school principal’s office holding every student’s file, schedule, and locker
combination — except the “students” are servers, and the “files” are operating system images and
configuration.
Practice — Section 2
- On
head-node , install
ansible (sudo apt install ansible ). Ansible is a lightweight,
free stand-in for what BCM does at a much larger scale: push config out from one place to
many. - Create an inventory file listing your three compute nodes’ IPs.
- Write a 5-line Ansible playbook that installs
the head node.
htop on all three compute nodes at once, from - Run it:
ansible-playbook -i inventory.ini install.yml . Watch all three nodes update
simultaneously — that’s the “one node manages many” pattern every SuperPOD is built on.
3. Provisioning the Operating System
How does a brand-new, blank server get its OS without anyone touching a keyboard in the data center?
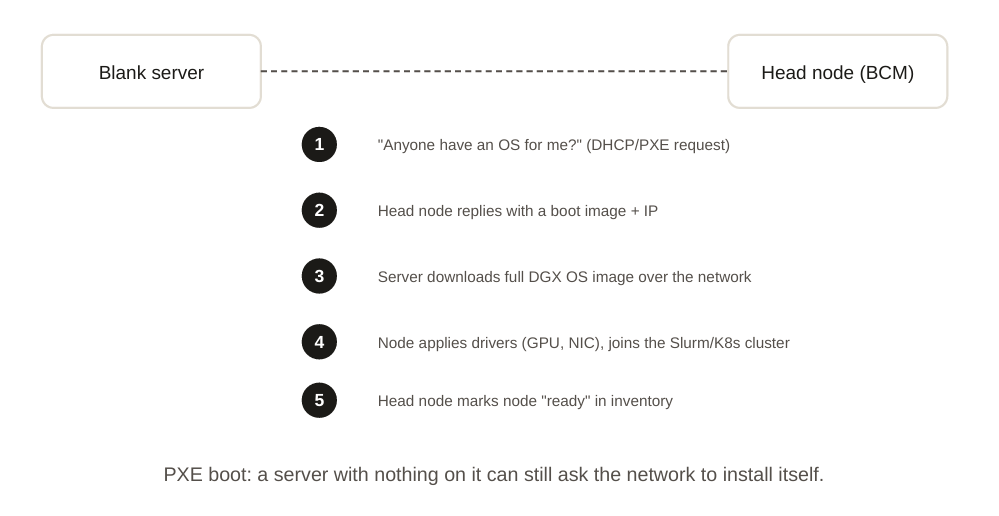
Before Base Command Manager, configure the Ethernet management, out-of-band management, InfiniBand compute, and storage networks — then a real deployment must be able to hand a bare server an operating system automatically. This uses PXE boot: the server, with no OS installed, broadcasts “does anyone have an operating system for me?” onto the network. The head node answers, hands it a tiny boot loader, and that boot loader pulls down the full OS image.
You will not truly PXE-boot on a laptop lab (it needs real bare-metal network booting) — but you can watch
the exact same handshake happen using virtual machines, which is 90% of the learning value.
Practice — Section 3
- Spin up a brand new, empty VM called compute-04 — don’t attach an OS ISO yet.
- Set its network adapter to boot from network (most hypervisors have a “PXE boot” or “network boot” option in VM settings).
- Watch it try to network-boot and fail (since we haven’t set up a real PXE server) — this failure screen is actually useful: read what it’s requesting. You’ll see it asking for DHCP + a boot filename, which is exactly step 1–2 in the diagram above.
- Optional stretch goal: install dnsmasq on head-node and configure it as a minimal PXE/DHCP server, then successfully network-boot compute-04 into a tiny Linux image (guides for “dnsmasq PXE boot Ubuntu” walk through this in under 30 minutes).
4. Layering Kubernetes on Top (No vCluster Needed)
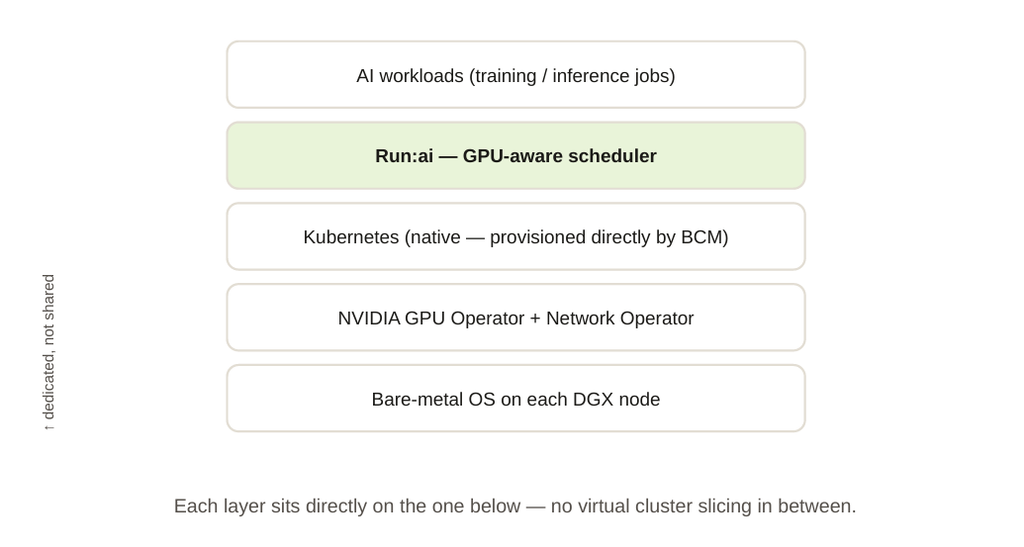
This is the step the original question was about — and it’s simpler than it sounds. Once every node has an OS, the head node’s software provisions Kubernetes directly onto that same bare metal — one real cluster, not a virtual slice of one. NVIDIA’s Base Command Manager leverages Slurm and Kubernetes together for AI and HPC workload orchestration, and layers NVIDIA Run:ai on top for GPU-aware scheduling. That’s the alternative to vCluster: instead of virtualizing many tenant clusters on top of one shared cluster, BCM gives every SuperPOD its own dedicated, natively provisioned Kubernetes cluster, with tenancy handled by scheduler policies (Slurm partitions, Run:ai projects) rather than virtual cluster boundaries.
vCluster vs. this approach: vCluster is like renting subdivided office space inside one building you don’t own. BCM’s native approach is like each team getting its own building, with a shared reception desk (the scheduler) deciding who gets which meeting room and when.
Practice — Section 4
- Install kind (Kubernetes-in-Docker) — a free way to run a real Kubernetes cluster on your
laptop in under 2 minutes: kind create cluster –name mini-superpod . - Check the nodes: kubectl get nodes . This one cluster is standing in for the “native Kubernetes provisioned directly on bare metal” layer.
- Install the NVIDIA GPU Operator’s Helm chart (it will safely no-op without real GPUs, but you’ll see every component it tries to deploy — device plugin, DCGM exporter, node feature discovery): helm repo add nvidia https://helm.ngc.nvidia.com/nvidia helm install gpu-operator nvidia/gpu-operator -n gpu-operator –create-namespa
- Run kubectl get pods -n gpu-operator and read the pod names out loud — each one maps directly to a box in the diagram above.
5. Submitting Your First Job
Everything above exists so this one moment works reliably: a researcher submits a job, and it runs on the right hardware.
When a job is submitted, the scheduler (Slurm, or Run:ai on Kubernetes) checks which nodes have free capacity, which nodes match requested resources (e.g. “I need 8 GPUs on nodes with fast interconnect”), and places the job accordingly — resolving any queueing when demand exceeds supply.
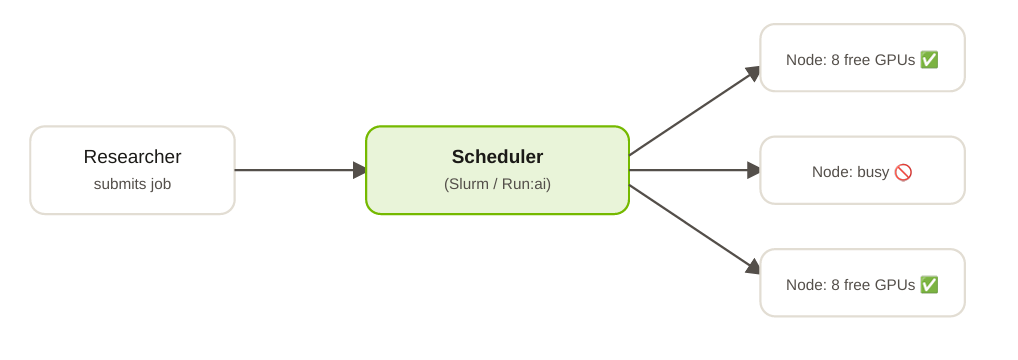
The scheduler is the traffic cop matching jobs to the nodes that can actually run them.
Practice — Section 5
1. On your kind cluster from Section 4, submit a plain test pod that requests a fake resource: kubectl run test-job –image=busybox –restart=Never — sleep 30
2. Immediately run kubectl get pod test-job -o wide — see which node it landed on. That placement decision is exactly what Slurm/Run:ai does, just with GPU-awareness added.
3. Delete the pod, then artificially “fill up” a node (cordon it: kubectl cordon ) and resubmit the job — watch the scheduler route around the busy node, same as it would route around a busy DGX node in a real SuperPOD.
6. Zooming Back Out: NVIDIA Mission Control
The five pieces you just practiced are exactly what NVIDIA now ships as one bundle. NVIDIA Mission Control is the standard software layer for every current DGX SuperPOD, streamlining AI operations from workloads to infrastructure, and it bundles Base Command Manager and Run:ai together with an observability stack — the same five layers you just built by hand, just delivered as one integrated product with dashboards on top.
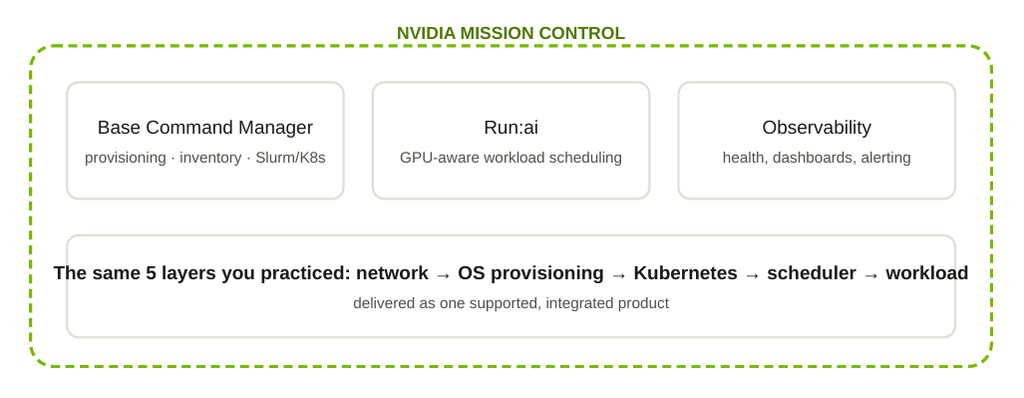
Mission Control isn’t a new concept — it’s the packaging of everything you just practiced.
Conclusion: From a Mini Lab to Real AI Infrastructure
Building a mini NVIDIA DGX SuperPOD lab is a practical way to understand how modern AI infrastructure works without requiring physical DGX systems or a production data center.
Throughout this guide, we moved from basic compute and networking concepts to centralized management, automated provisioning, Kubernetes, GPU-aware scheduling, and NVIDIA Mission Control. More importantly, each step demonstrates how the individual layers of a DGX SuperPOD work together to support scalable AI workloads.
Although a laptop lab cannot reproduce the performance of real NVIDIA DGX infrastructure, it can help engineers understand the architecture, workflow, and operational principles behind large-scale GPU clusters.
Next, continue exploring the AI Infrastructure workbook on NetworkBachelor for practical guides covering NVIDIA GPUs, Kubernetes, GPU scheduling, observability, and enterprise AI infrastructure.
Planning NVIDIA GPU or AI Infrastructure?
Moving from a lab environment to production requires the right architecture across compute, networking, security, Kubernetes, GPU orchestration, and operations.
If your organization is planning, designing, or deploying NVIDIA GPU, Kubernetes, or enterprise AI infrastructure, connect with Trezbon Technologies.
Talk to our consultants:
https://trezbon.com/#contact
Part of the AI Infrastructure workbook series on networkbachelor.com

Arista Network Advantage: Lower TCO with Power-Efficient Platforms
vCloud Director: NSX-V to NSX-T Migration Part-2
API Security Architecture: Inline vs Out-of-Band Enforcement
About Author

abhishek
Expert in Network, Virtualization and Security field in On-Prem and Public Cloud. Passionate about new technology and consult the best solution to business organisation.Previously served Networkershome, EMC2, Cisco, VMware and Arista in different fields of Engineering, TAC, Consulting, Designing and Training. Certification : CCIE#48639, VCIX DCV and NV, Aviatrix Multi Cloud, SD-WAN Specialist, Palo Alto PCNSE, Amazon Cloud, Docker Certified Engineer. LinkedIn : https://www.linkedin.com/in/abhishekkunal51/