Kubernetes CNI Networking Explained: Pod Networks, CNI & Flannel
In Part 1, we built the networking foundation: OSI layers, overlay networking, network namespaces, veth pairs, and Linux bridges. Now, we can put those building blocks to work.
In this part, we’ll explore what the Kubernetes pod network actually requires. Then, we’ll examine the Container Network Interface (CNI) and why Kubernetes relies on it. Finally, we’ll see how Flannel implements pod networking in practice.
This narrow contract is intentional. Because the interface is so small, very different networking implementations can sit behind it. For example, one plugin might create a simple bridge network, while another programs BGP routes or builds VXLAN tunnels. As a result, the container runtime does not need to understand the underlying networking method.
The Pod Network: What Kubernetes Actually Requires
Before touching any specific plugin, it’s worth being precise about the networking model Kubernetes mandates. It’s a short list, but every item on it has real implementation consequences:
- Every pod gets its own IP address.
- Pods can reach all other pods across the entire cluster using that IP, on every node, without NAT.
- Nodes can reach all pods, and vice versa, without NAT.
- Whatever a pod believes its own IP is, that’s the same IP everyone else sees it as.
That’s it. Kubernetes itself does not implement this — it delegates the job entirely. Which raises the obvious question: delegates to what, exactly, and how does the delegation work? That’s what CNI answers.
The CNI Specification: A Contract, Not a Product
CNI is not a piece of software you install—it’s a specification.It defines a simple contract between two parties. A container runtime, such as containerd or CRI-O, requests the network setup. A plugin then performs the required networking tasks.
How the CNI Contract Works
The contract is deliberately narrow. A CNI plugin is an executable that supports a handful of operations. The two most important are:
- ADD — “Here’s a network namespace. Set up networking for it and tell me what you did.”
- DEL — “Tear down the networking you set up for this namespace.”
When a pod is created, the runtime invokes the CNI plugin binary directly. First, it passes the configuration as JSON over stdin. It also provides the container ID, namespace path, and interface name through environment variables.
Next, the plugin performs the required networking tasks. For example, it may create a veth pair, attach it to a bridge, and assign an IP address.
Finally, the plugin returns a JSON result describing the interfaces and IP addresses it configu
CNI is not a piece of software you install — it’s a specification. It defines a simple contract between two parties. A container runtime, such as containerd or CRI-O, requests the network setup. Then, a plugin performs the required networking tasks.
The contract is deliberately narrow. A CNI plugin is an executable that supports a handful of operations, the two that matter most being:
- ADD — “here’s a network namespace, set up networking for it and tell me what you did.”
- DEL — “tear down the networking you set up for this namespace.”
The runtime invokes the plugin binary directly. First, it passes the configuration as JSON over stdin. Environment variables provide the container ID, namespace path, and interface name.
Next, the plugin creates a veth pair and attaches it to a bridge. It also assigns an IP address. Finally, the plugin returns a JSON result with the configured interfaces and IP addresses.
This narrowness is the entire point. The small CNI contract supports many networking implementations. For example, a plugin can create a bridge or program BGP routes. It can also build VXLAN tunnels or attach an SR-IOV virtual function. Meanwhile, the runtime does not need to understand the underlying implementation. It just knows the plugin was invoked and got a valid result back.
IPAM as a separate plugin. CNI further splits IP address management out as its own plugin type, invoked by the main CNI plugin rather than by the runtime directly. This is why you’ll see Flannel’s config reference a host-local IPAM plugin — Flannel handles the “how do I get packets to this pod” problem, and delegates “which IP does this pod get” to a dedicated, swappable component. This separation is one of the more underappreciated design decisions in the spec: it’s why almost every CNI plugin can share the same handful of IPAM plugins instead of reimplementing address allocation from scratch.
Where kubelet fits in. kubelet doesn’t call CNI plugins directly — that job belongs to the container runtime, via the CRI (Container Runtime Interface). When kubelet asks the runtime to start a pod, the runtime creates the pod’s sandbox (the shared network namespace for all containers in the pod), then invokes the configured CNI plugin’s ADD command against that namespace before any application containers start.
How the Pieces Fit Together
Creating a pod’s network follows a simple process. First, the scheduler places the pod on a node. Next, kubelet asks the container runtime to create it. The runtime then creates the sandbox network namespace. Finally, it passes that namespace to the CNI plugin for network configuration.

Everything left of “CNI plugin” is Kubernetes/CRI machinery. Everything at and after it is where the actual plugin — Flannel, Calico, Cilium, whichever you’ve installed — takes over.
Note what’s notably absent from that chain: Kubernetes has no idea what happens inside the CNI plugin box. It doesn’t know if it’s VXLAN, BGP, or something exotic. That ignorance is a feature — it’s what lets CNI plugins innovate independently of Kubernetes release cycles.
Flannel: The Reference-Simple CNI Plugin
Flannel is one of the oldest CNI plugins still in active use, and it’s worth studying specifically because it’s simple — it does one job (give every pod cluster-wide reachability) without trying to also be a network policy engine, a service mesh, or a BGP speaker. That simplicity makes it an excellent teaching example before we look at Calico’s very different approach in Part 3.
Flannel’s architecture has three moving parts on every node:
flanneld, a daemon running on each node. Its job is to allocate a subnet to that node out of the cluster-wide pod CIDR, and to learn the subnet allocations of every other node in the cluster.
A backing store for those subnet leases. In most modern deployments this is the Kubernetes API server itself (Flannel watches a NodeSpec.PodCIDR or a dedicated CRD, depending on version); older deployments used etcd directly. Either way, this store is what turns “I have a subnet” into “everyone in the cluster knows everyone else’s subnet.”
cni0, the Linux bridge on each node that Flannel’s CNI plugin creates and attaches every local pod’s veth pair to — exactly the bridge mechanism from Part 1, just with Flannel doing the setup and IPAM bookkeeping.
When a new node joins the cluster, flanneld requests an unused subnet slice (say, 10.244.5.0/24 out of a cluster-wide 10.244.0.0/16), writes that allocation to the backing store, and configures local routes so anything destined for pods on that node lands on cni0.
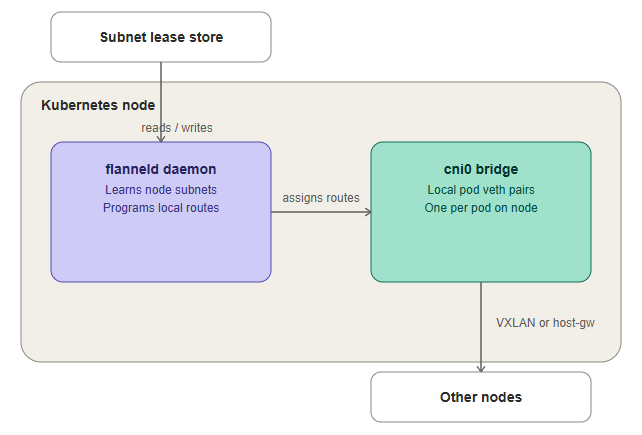
The subnet store is what makes this scale cluster-wide: node A doesn’t need to know node B’s topology, only that packets for 10.244.7.0/24 should go to node B’s IP — and the store is where it learns that mapping.
Flannel’s Backends: How Traffic Actually Gets Between Nodes
Where Flannel gets interesting is in its pluggable backends — the mechanism it uses to move a packet from one node’s cni0 bridge to another node’s, once local routing alone isn’t enough (i.e., the destination pod isn’t on this node).
- VXLAN backend — this is the overlay approach from Part 1, applied concretely. Flannel creates a
flannel.1VXLAN interface on each node; when a packet needs to leave the node, it’s encapsulated in a VXLAN/UDP header addressed to the destination node’s IP, sent across the existing physical network, and decapsulated on arrival. This is the default in most cloud and on-prem deployments because it requires zero changes to the underlying network — the physical switches only ever see UDP traffic between known node IPs. - host-gw backend — no encapsulation at all. Flannel simply adds a host route on every node saying “to reach subnet
10.244.7.0/24, send it to node B’s IP as the next hop,” and relies on the underlying network being a flat Layer 2 segment where nodes can reach each other’s IPs directly as a gateway. This is faster (no encapsulation overhead) but only works when all nodes sit on the same L2 network — it won’t cross routed boundaries without additional help. - Other backends (UDP, IPIP, and cloud-specific ones) exist for particular environments, but VXLAN and host-gw are the two you’ll encounter in the overwhelming majority of real clusters.
This backend choice is a direct, practical instance of the overlay-versus-native-routing trade-off from Part 1: VXLAN buys you portability at the cost of encapsulation overhead; host-gw buys you performance at the cost of requiring a flat L2 fabric.
In other words, the choice comes down to portability versus network simplicity and performance. VXLAN works across more network designs because it encapsulates pod traffic. By contrast, host-gw avoids encapsulation but depends on direct Layer 2 reachability between Kubernetes nodes.
What Flannel Deliberately Doesn’t Do
It’s worth being explicit about Flannel’s scope, because it explains why Calico and Cilium exist as alternatives rather than redundant competitors. Flannel provides pod-to-pod reachability across the cluster — full stop. It has no native support for Network Policies (restricting which pods can talk to which), and it doesn’t participate in BGP peering with your physical network by default. If you need Kubernetes-native network policies, you’d traditionally pair Flannel with a separate policy engine (this used to be a common combination before more integrated CNI options existed), or move to a plugin like Calico that handles both concerns natively.
That’s exactly where we’re headed next.
Try It Yourself: Invoking a Real CNI Plugin by Hand
Everything about the CNI contract above stays somewhat abstract until you’ve actually called a plugin yourself. This lab does exactly that — no Kubernetes involved, just the reference CNI plugin binaries and a small tool called cnitool that plays the role of the container runtime from the sequence diagram earlier in this post. You’re manually performing the two steps that come after “Runtime creates sandbox”: invoking the CNI plugin’s ADD, and watching it delegate to an IPAM plugin.
If you still have the two-VM lab from Part 1 running, you can do this on either VM — it’s independent of the bridge you built by hand there, since this creates its own bridge.
Install the Reference Plugins and cnitool
# The official reference CNI plugin binaries — includes "bridge" and "host-local"
sudo mkdir -p /opt/cni/bin
curl -L https://github.com/containernetworking/plugins/releases/download/v1.5.1/cni-plugins-linux-amd64-v1.5.1.tgz \
  | sudo tar -C /opt/cni/bin -xz

# cnitool: a small CLI that calls a CNI plugin exactly like a runtime would
go install github.com/containernetworking/cni/cnitool@latest
sudo cp "$(go env GOPATH)/bin/cnitool" /usr/local/bin/
Write the Network Configuration
This JSON is what a real runtime would read before invoking the plugin — it’s the same “bridge” plugin Flannel itself wraps around, just invoked directly instead of by flanneld:
sudo mkdir -p /etc/cni/net.d
cat <<'EOF' | sudo tee /etc/cni/net.d/10-mynet.conf
{
  "cniVersion": "1.0.0",
  "name": "mynet",
  "type": "bridge",
  "bridge": "cni_bridge0",
  "isGateway": true,
  "ipMasq": true,
  "ipam": {
    "type": "host-local",
    "subnet": "10.22.0.0/24",
    "routes": [{ "dst": "0.0.0.0/0" }]
  }
}
EOF
Create a Sandbox Namespace — the Step Before the CNI Plugin Runs
In a real cluster, this is the container runtime’s job, done just before it calls ADD:
sudo ip netns add mypodCall ADD — This Is the Actual CNI Invocation
export CNI_PATH=/opt/cni/bin
export NETCONFPATH=/etc/cni/net.d
sudo -E cnitool add mynet /var/run/netns/mypod
You’ll get back a JSON result describing the interface and IP the plugin configured — that’s the ADD response format described earlier in this post, printed to your terminal instead of consumed by a runtime. Behind the scenes, the bridge plugin just did three things: created the cni_bridge0 bridge if it didn’t exist, created a veth pair with one end in mypod, and called out to the host-local IPAM plugin to get an address from 10.22.0.0/24 — the exact ADD → IPAM delegation from the sequence diagram above, just running on your terminal instead of inside kubelet.
Verify What the Plugin Actually Did
# The pod's interface and assigned IP
sudo ip netns exec mypod ip addr show
sudo ip netns exec mypod ip route show

# The bridge the plugin created, and the veth attached to it
ip link show cni_bridge0
ip link show master cni_bridge0

# Connectivity out, via the ipMasq rule the plugin configured
sudo ip netns exec mypod ping -c 3 8.8.8.8
Call DEL — Tearing It Back Down
sudo -E cnitool del mynet /var/run/netns/mypod
sudo ip netns del mypod
This is the other half of the CNI contract: DEL undoes exactly what ADD set up — removing the veth pair and releasing the IP back to the host-local IPAM plugin’s allocation pool.
Once this feels routine, it’s worth reading the bridge plugin’s behavior against Flannel’s architecture section above: flanneld isn’t a competing implementation of what you just did by hand — it’s automation around this exact same bridge-plus-IPAM pattern, adding the subnet-lease coordination and cross-node backend that make it work cluster-wide instead of on one host.
Where This Goes Next
With CNI’s contract and Flannel’s concrete implementation in place, the next posts get progressively more sophisticated:
- Part 3: Calico CNI in depth — BGP-based routing, and native Network Policy enforcement
- Part 4: Kubernetes Services — how ClusterIP, NodePort, and kube-proxy sit on top of everything covered so far
- Part 5: Intro to Network Policies
- Part 6: Calico Network Policies
This post accompanies Part 2 of the Understanding Kubernetes Networking video series: POD Network, CNI, and Flannel CNI Plugin.
Conclusion: From Kubernetes CNI to Real Pod Networking
Kubernetes networking becomes much easier to understand once you separate the responsibilities of Kubernetes, the container runtime, CNI, IPAM, and the networking plugin.
First, Kubernetes defines the networking requirements but does not implement the pod network itself. Instead, the container runtime invokes a CNI plugin to configure each pod’s network namespace.
Next, the CNI plugin creates the required interfaces and delegates IP allocation to IPAM. In Flannel’s case, this model extends across the cluster by assigning pod subnets to nodes and using backends such as VXLAN or host-gw for cross-node communication.
Most importantly, understanding this packet path gives you a practical framework for troubleshooting Kubernetes networking instead of treating CNI as a black box.
In Part 3, we’ll build on this foundation and explore Calico CNI, including BGP-based routing and Kubernetes Network Policy enforcement.
Need Help Designing Kubernetes or Cloud-Native Infrastructure?
Building a production Kubernetes environment requires more than installing a CNI plugin. Network architecture, segmentation, security, observability, performance, and scalability all need to work together.
Trezbon helps organizations design, deploy, secure, and optimize enterprise infrastructure and Kubernetes environments.
👉 Talk to Trezbon: https://trezbon.com/#contact
NVIDIA GPU Workloads on Kubernetes — Part 11: Key Concepts Deep Dive

NVIDIA Switches Explained: Models, NVUE CLI & Protocol Support
Kubernetes for AI/ML Workloads: GPU Scheduling & MLOps Guide
About Author

abhishek
Cloud Platform Lead and AI Infrastructure Architect at e& enterprise, with 12+ years in data center, virtualization, security and AI infrastructure. I design and build private cloud and sovereign AI platforms, working with VMware (NSX-T, vSphere, vSAN, HCX, AVS, SRM), Kubernetes, Terraform and GPU inference infrastructure for LLMs. Previously served Networkers Home (CCIE instructor, trained around 50 CCIEs), VCE/EMC2, Cisco, VMware and Arista across TAC, consulting, design and training. Certifications: CCIE#48639 (Data Center and R&S), VCIX-DCV and NV, CKA, NVIDIA AI Infrastructure, Azure Solutions Architect Expert, Terraform Associate, Palo Alto PCNSE. LinkedIn: https://www.linkedin.com/in/abhishekkunal51/